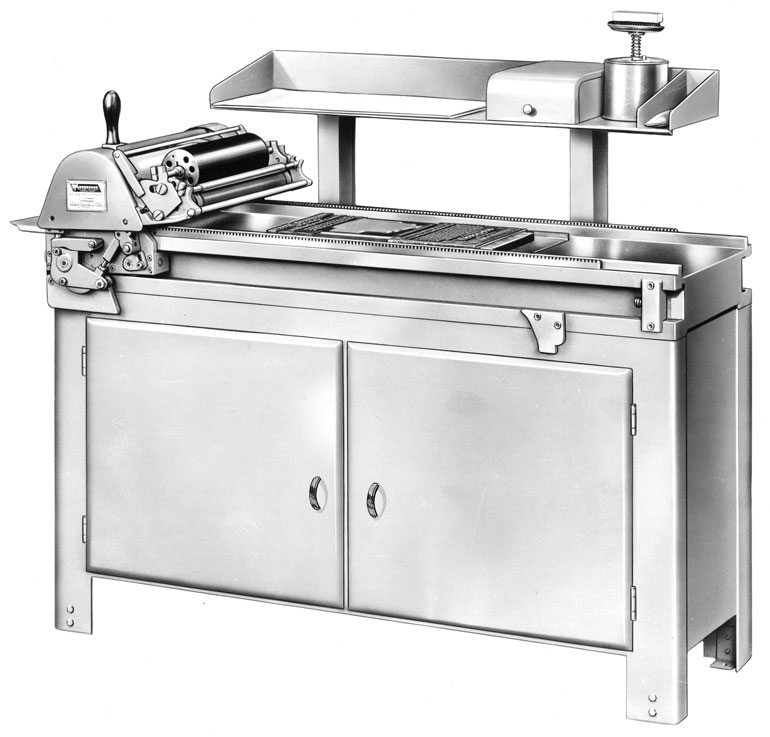
Vandercook/Western 05
The Western 05 is a licensed copy of the Vandercook 05 made in the UK. The 05 model is a "hand pulled" press - as opposed to "hand cranked" presses like the SP25.
I own a Western 05, so most of the outrageous claims I'll be making pertain to the Western model and not neccessarily to the Vandercook 05, as the more I look at them the more subtle differences I see.
There's not a great deal of information on the 05 models but they don't have the appeal of the SP25 for a couple of reasons:
- They don't have any form of gripper bars or friskets to aid registration
- They don't have power inking
- The press is designed as a galley press, so type cannot be set directly in the bed without an underlay of some kind.
- There is no adjustment of impression pressure.
Of all of these, the lack of a gripper bar and friskets is the one I find most challenging.
Laying the paper directly onto an inked forme often leads to phantom ink marks unless the paper is laid very precisely and doesn't move during the impression pass.
(In theory the operating process is to feed the paper into the press as the carriage is moving to the right during the impression pass
but I imagine that would lead to a page not being printed square as you're feeding the paper under the raised ink rollers.)
Conversely, the lack of grippers may speed up the printing process as the paper can be fed and removed from the press continuously (squareness and registration issues accepted).
The lack of power inking isn't a great hardship so long as you follow the inking procedure for the press. It's just a couple of passes with the carriage.
The lack of adjustment is somewhat addressed by the fact that the press is a galley press.
Instead of using a galley you can simply use an underlay sheet of thin steel to lay the forme upon (see note below about thicknesses).
By putting a sheet of paper or card on this steel underlay the impression can be easily adjusted. I favour packing out with a soft material like paper or card rather than steel as on the offchance you add too much it'll compress a bit and maybe not harm the impression cylinder as much.
There is a note in the manual which indicates that the maximum thickness of the underlay sheet should be .055" or 1.397mm.
The intended galley thickness (that the press was designed for) is .050" or 1.27mm, so there's not a lot of leeway between minimum and maximum.
Vandercook .vs. Western
There are some minor differences between the 05 and my Western model, the most notable of which is that the Vandercook model shows a rack gear rail to drive the rollers on both sides of the press whereas the Western 05 has a single rack gear rail on the operator's side of the press.
The other difference I notice is there's an adjustment nut on both sides of the Western carriage between the upper and lower carriage links. This will raise or lower the carriage slightly on the side that you're adjusting for fine tuning.
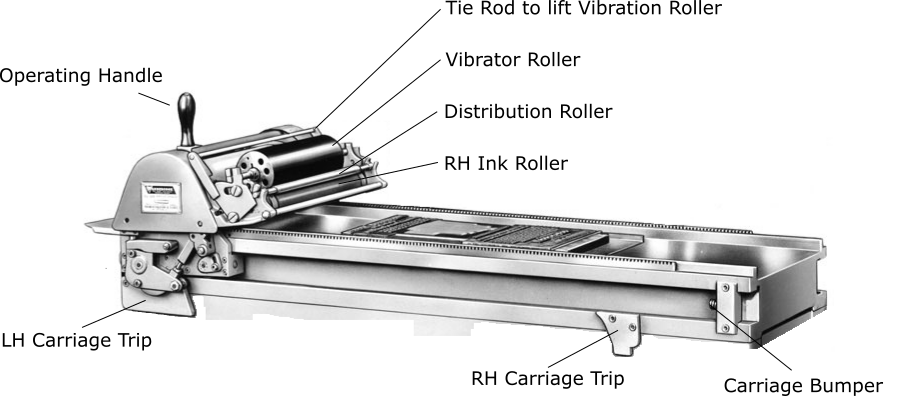
Drive Train
The large gear on the impression cylinder engages with the rack of the press bed driving the impression
cylinder. The impression cylinder also drives another gear wheel which engages with the first (leftmost)
ink roller. The left ink roller drives the vibrator roller which in turn drives the second ink roller
which in turn drives the metal distribution roller (i.e. the roller rider).
The vibrator roller, second ink roller, and roller rider are all driven by contact friction - the
left roller is the only one which is geared. (There is some engagement with the bed via the trucks
on the ink rollers however the first ink roller is the "drive" roller)
Carriage trips
There is a carriage trip at either end of the carriage way on the sideis of the press.
The trip at the right end of the press will raise the impression cylinder and lower the ink rollers whereas the trip at the left end of the press will raise the ink rollers and lower the impression carriage.
Once the cylinder has tripped there is no easy way to "untrip" it other than moving it to the other end of the carriageway as there's a considerable force required to activate the trip - applied from both sides of the press.
Inking
The carriage is moved to the righthand end of press bed and ink is applied to the distributor roller (a small bar around 1" in diameter which runs against the right ink roller).
The carriage is moved all the way to the left which transfers ink from the right ink roller to the steel vibrator roller and then to the left ink roller.
Ideally you'd move the carriage back and forth a couple of times to ensure even inking prior to placing the forme on the press bed.
Operation of the elevator arm to the right will lift the vibrator roller away from the ink rollers.
The practical applications of this are to aid cleaning (the vibrator roller can be pulled from the press) OR to prevent further blending of colours when multiple colours have been blended on the rollers.
That second option is probably fairly limited as the left roller will never be reinked while the righthand roller will only be inked by the distributor roller which is a pretty poor reservoir.
General Cleaning of Vandercook rollers were designed to be performed with kerosene and rags, however the 05 manual suggests that washup should be performed with "a mixture of 2 quarts high test gasoline, 2 quarts kerosene, 1/2 pint of light machine oil"
The ink rollers can be easily removed from the press by pushing the elevator lever to the left to right the vibrator roller off the ink rollers.
Lift the vibrator roller from the press and you will be able to remove the two ink rollers. Note that one roller is held in place with a small arm which is locked into place with a spring loaded pin that engages with the elevator on the operator's side of the press.
Pull the pin toward the back of the press and then lift the arm to free the roller.
Specs
Bed Size: 15"x26"
Maximum Forme size: 14"x24"
Maximum Sheet Size: 14&3/4"x28"
Floor Space Required: 5'4"x1'11"/1.6mx.58m
Minimum Galley thickness: .050"/1.27mm
Maximum Galley thickness: .055"/1.397mm>
Height of bed from floor (if mounted on the cabinet): 34.5"
Shipping Weight: 800lbs/363kgs
Ink Roller Core diameter: 1&5/16" (33.3375mm)
Ink Roller Rubber Diameter: 2.205" (56.007mm)
Length of rubber on roller: 14.5" (368.3mm)
Inking Roller Durometer: A20-25
Impression Cylinder Durometer: A60-70
Note: The impression cylinder durometer is mentioned in the sales information as a 3-density impression cylinder so the 60-70 is probably more of a workable solution.
Note: Whilst the roller dimensions for my press are provided here if you're after a good quality roller you may want to talk to NA Grapics.
Maintenance
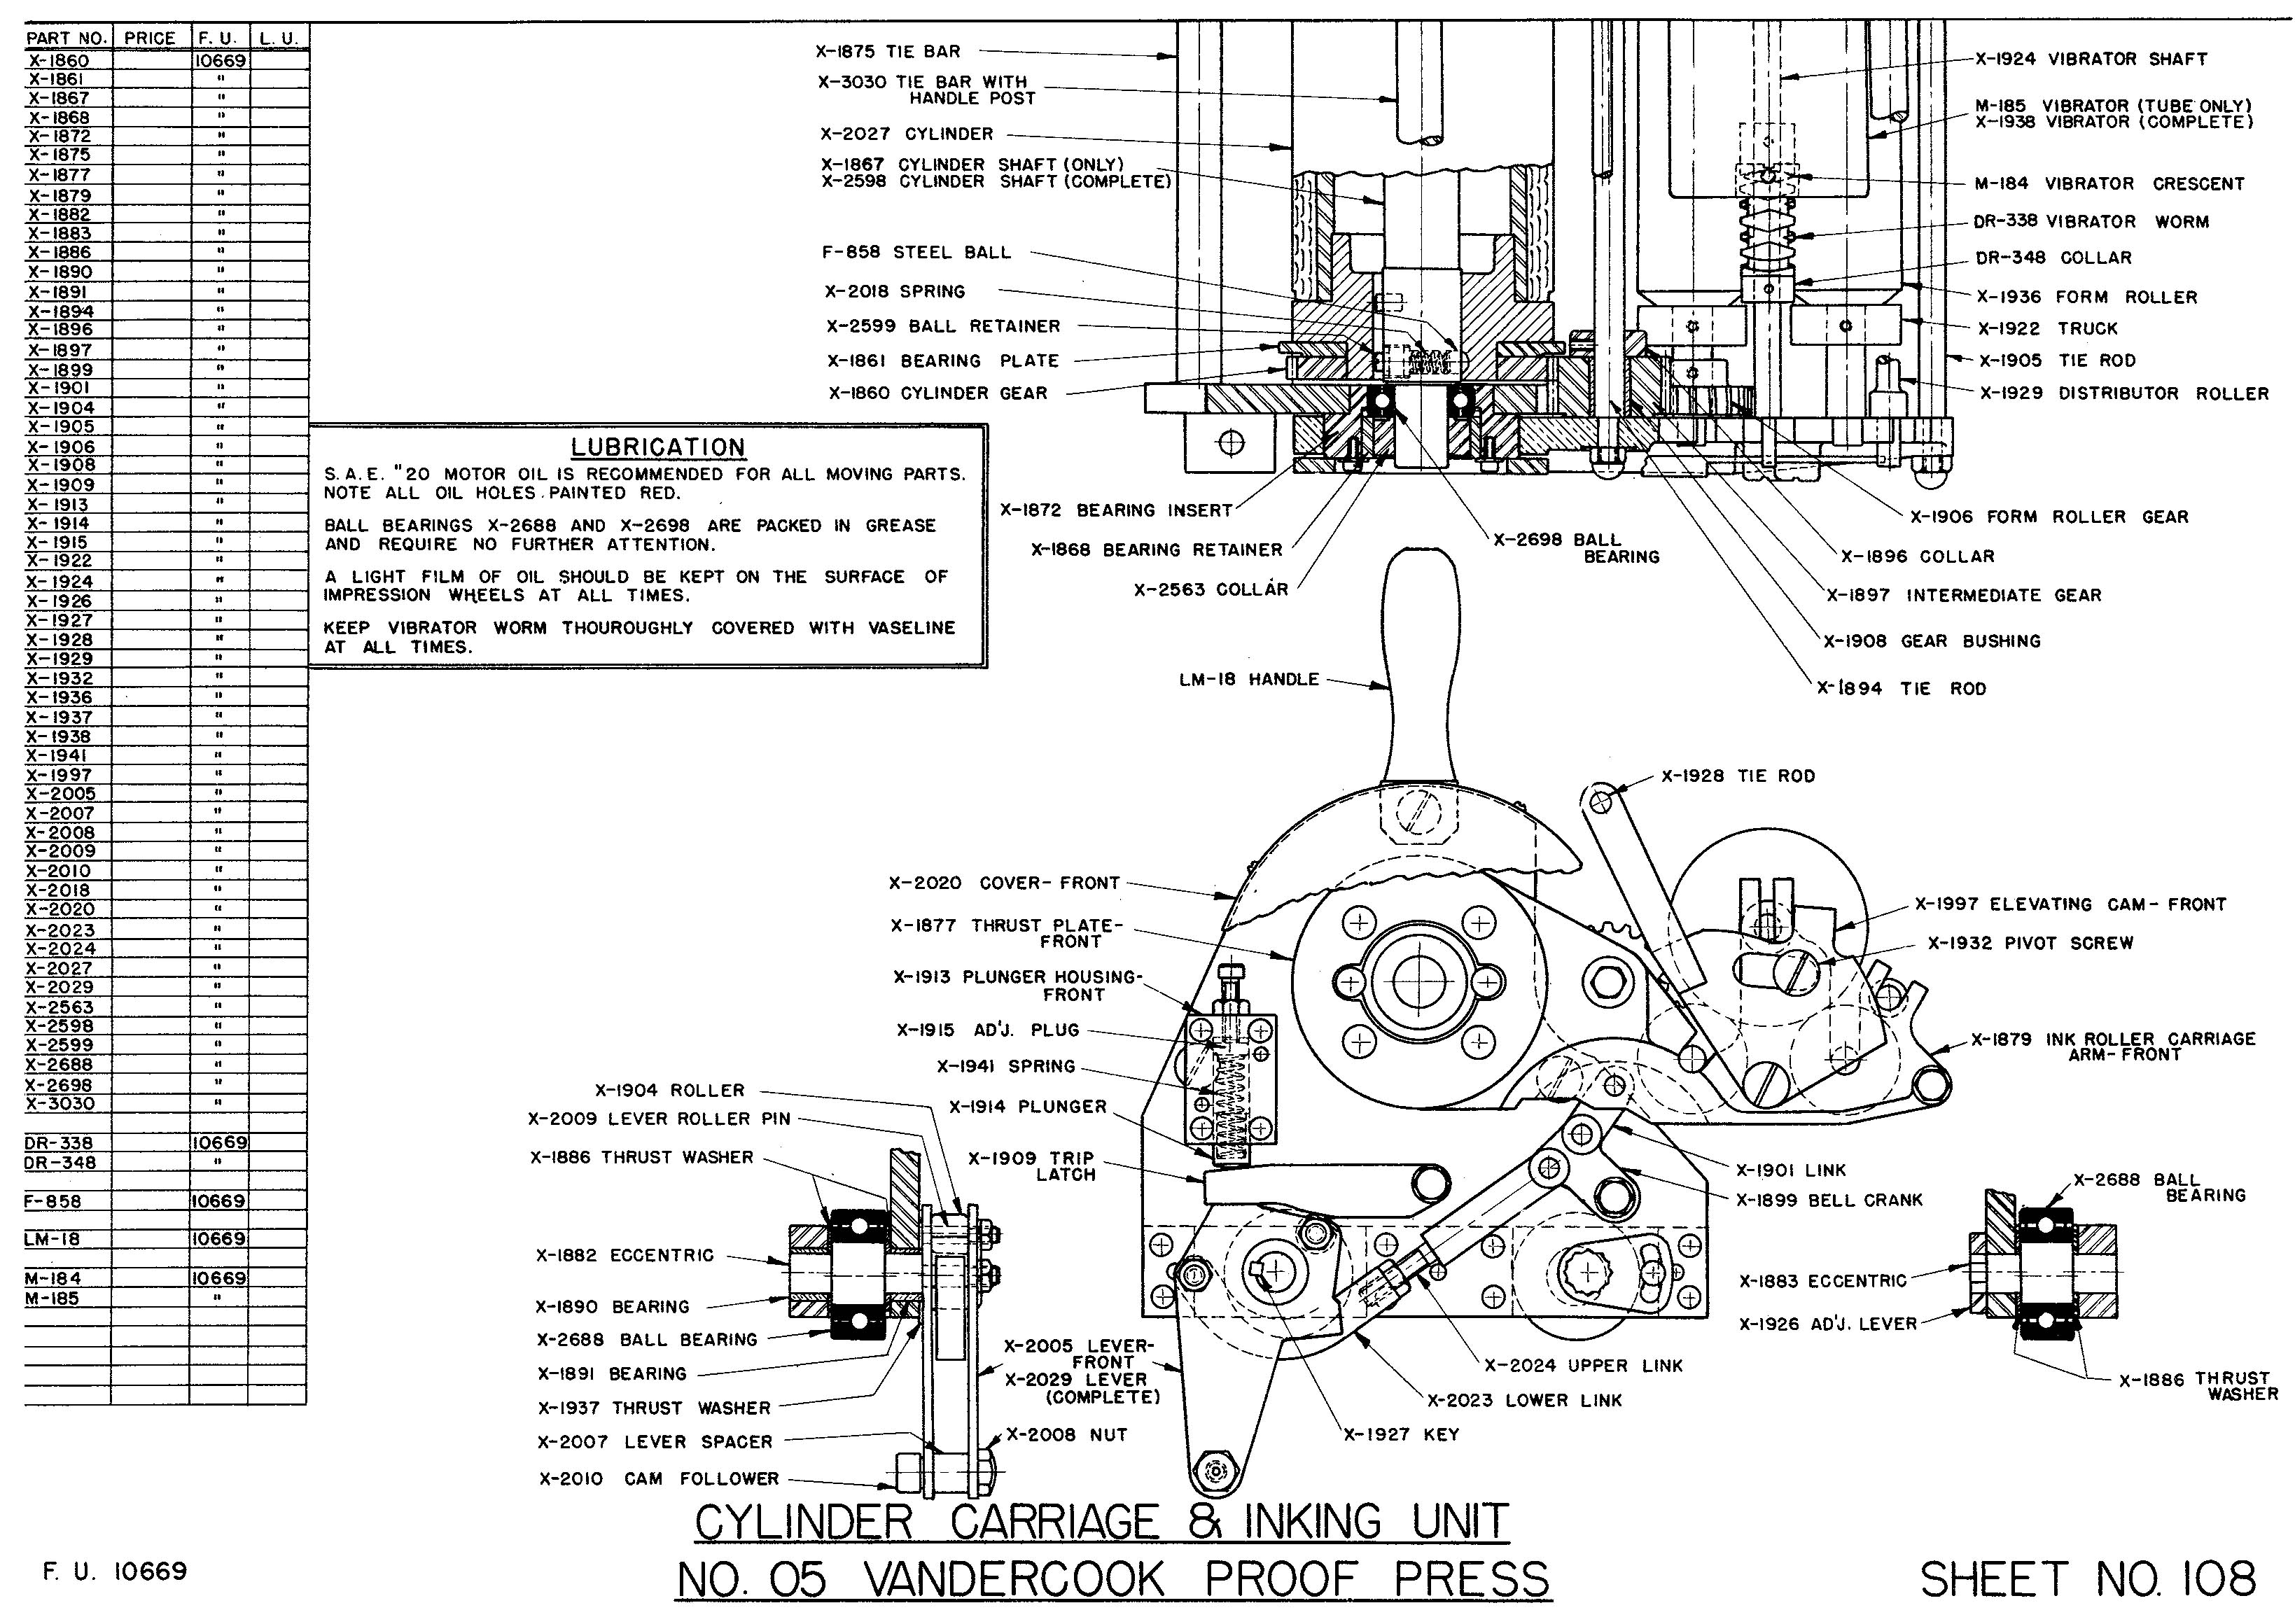
Lubrication
SAE 20 motor oil is recommended for all moving parts.
There are many bearings which will need oiling and there are holes in the carriage covers for access. The ink rollers are plain bearings, not ball bearings so the ends of the roller shafts should be oiled where they fit into the carriage.
The instructions note that the rack should have a thin coverage of oil.
Vaseline is recommended for the lubrication of the vibrator roller mechanism.
Storage
From my press and others I've seen, it seems that the vibrator roller cylinder is prone to rusting if it's left standing for some time. The rust on mine occurred at the top of the drum in the position it was stored.
Ideally, if the press were to be placed into storage, it might be worth treating the drum and the press bed with a non-paint protectant like lanolin spray and covering it.
If storing remember to lift the elevator to prevent any 'flat spotting' of the ink rollers.
If you're planning on moving an 05, I'd recommend removing the ink and vibrator rollers then securing the carriage at one end of the carriageway.
The press cabinet has a roughly 2"x3" foot in each corner and should be relatively easy to slip a pallet jack under from the front or rear.
This press, like many presses, is top heavy - go slow and watch out for changes in level of the floor surface.
If you're planning on moving it on a pallet you may want to add some packing in the location of the feet and also screw some blocks down to hold it in-situ.
(My press arrived on a pallet with the corner smashed out, the strapping had come loose and the press was rocking on its feet. It required two people to stop it toppling while descending on the tail lift.).
Hacks
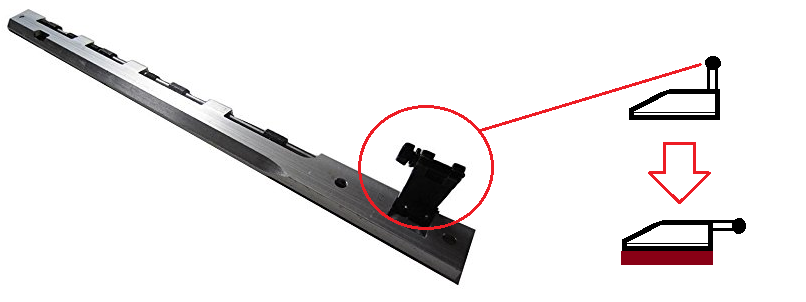
A "Heath-Robinson" gripper bar can be fabricated from a Heidelberg gripper bar mounted on a thin strip of wood.
To do this you'll need to cut the right-angled actuating arm off the gripper arm and reweld it to the arm parallel to the gripper as shown below.
Once this is done mount the arm on a thin piece of timber which is a "quion's height" shorter than the width of the press bed.
Lock the arm into the bed with a quoin and you're good to go. Press down on the lever to open the gripper jaws and insert your paper.
The nuance of this method is finding the correct thickness of timber to mount the gripper arm to.
It needs to be low enough that the carriage will pass over it without the mechanism hitting the ink or impression rollers but also high enough that it can grip card without it bowing upward when a chase is up against the gripper. Trial and error will win out. From memory I might have used 8-10mm.
I've heard of a method of keeping the paper off the inked forme - but have never tried it.
Some farley presses came with a feed tray which rode along on the carriage. You'd present the paper to the form and as the carriage moved along the paper would be drawn out of the tray and onto the form.
This won't work on the 05 as you'd have to feed the paper under the roller carriage arm and there would be no way of reaching the gripper bar (above) to lock the paper in place.
Instead, the suggestion was that you would have some rollers which ran along the bed and were "pushed along" by the carriage.

In theory you'd put several of these rollers over the form, lay your paper onto the rods/"axles" of the rollers and as the carriage moved along the rollers would roll along too, letting the paper down onto the forme.
The obvious conclusion is that you'd be picking the rollers up off the floor when they ran off the end of the bed.
I guess you could have ribbon or something similar holding the rollers together and maybe onto the base of the bed - but like I say, I've not tried it.
Other Vandercook Links
If the above people don't know it, noone will.