"The Squirts"
Or, how to set microswitches properly
A squirt shouldn't be a commonplace occurrance, but they are possible.
I've only had three occurances. Or technically four.
The first occurrance wasn't a squirt in the usual meaning of the word.
Whilst reinserting the plunger into the well after cleaning, it jammed very slightly, then released a little quicker than expected.
As the machine was in the idle state, the mould, stick and stickholder were away from the mouthpiece and the typemetal was molten.
The surge of the plunger, though fairly small, was enough to send typemetal over the slide and stickholder and onto the floor.
All but one of the other occurrances were all due to tinkering with the microswitch operation.
Normally there should not be a situation where the machine should have a squirt as the safety switches are designed to prevent this.
Three microswitches are installed in the stick holder microswitch assembly:
- Two "PIN" microswitches, one at either end of the microswitch assembly - that engage with movable microswitch pins in the Stick, and which should only become depressed when the stick is firmly pressed against the mouthpiece
- One "Matrix" microswitch in the middle of the Stick to ensure that there are mats properly installed in the Stick.
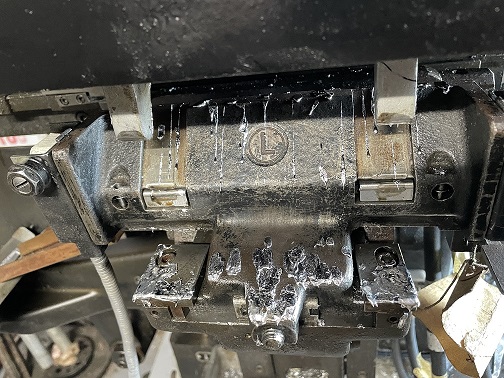
When the machine isn't quite locked up the casting pressure will force hot typemetal into any cavity between the component parts
with a fair amount of pressure. In the above picture you can also see the squirt has occurred between the mouthpiece and the stick
(around the bottom middle of the picture), AND ALSO between the mouthpiece and the mould, leaving quite a bit of metal on and above the
mouthpiece (top middle of the picture). Some metal has also been deposited behind the knife/wiper arm - all of which will need to be
cleared out prior to the next cast
Squirts two and three were due to the microswitches being poorly adjusted or wobbly (see adjustment, below) By themselves, neither of these things should have caused a squirt, however one was due to some debris from a previous squirt having been deposited under the covers above the mouthpiece, preventing the stick from fully homing; and the other was during a repeat casting cycle of blank slugs when the slug gripper dropped a slug into the elevator mechanism. In both cases the safety switches should have prevented a squirt, but in the first instance I was holding the switches closed manually and in the second one I'd over adjusted the microswitch set screws because of sloppy microswitch pins (adjustment, below). Mea Culpa.
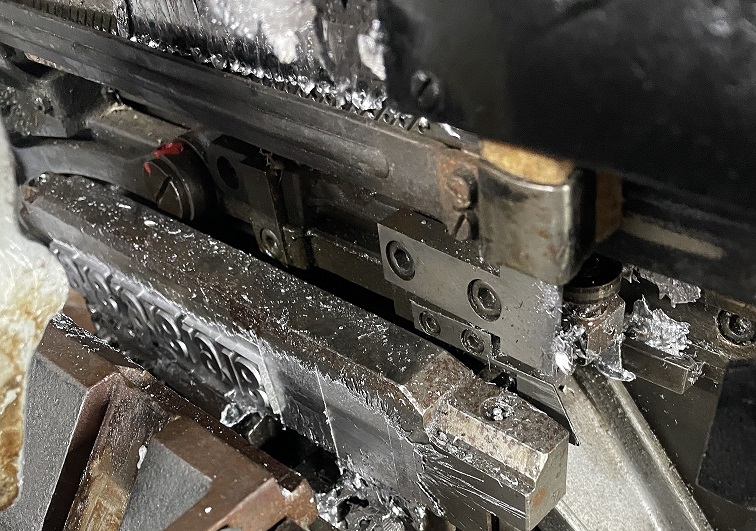
In the above picture the lockup can't have been tight - but in this case the squirt was due to a tiny amount of space between the
mould and the stick as there was no evidence of the squirt between the mouthpiece and mould. This can occur where the mats are uneven
in the stick or when a small piece of debris gets caught in the mechanism.
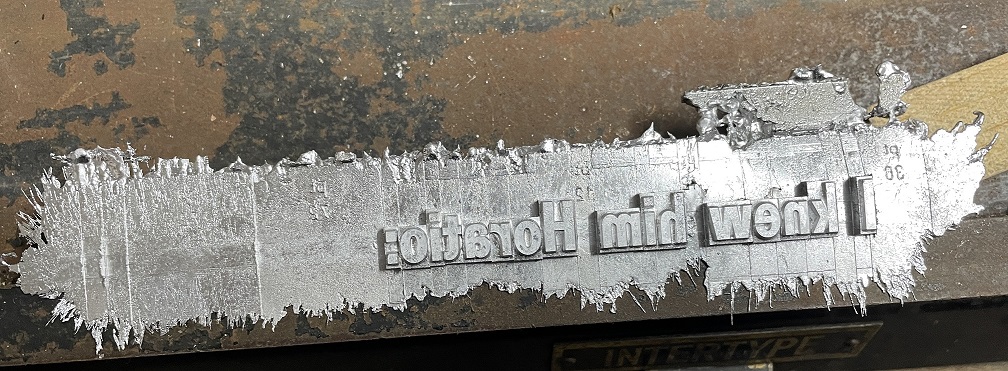
Squirt Four occurred when a mat wasn't properly installed and locked in the stick which caused a small gap between some of the mats and the mouthpiece, which in turn caused type metal to shoot out of the machine, some of which went under the covers to cause squirt #2 noted above.
What have we learnt?
The Microswitches are finicky to set correctly, and they should be trusted when set. If the machine isn't casting the cause of the
problem should be investigated.
Many times, a previous owner has become tired of the microswitches and has disabled some or all of them.
(My machine has had the Protection Guard (#521) microswitch removed and some of the microswitch assemblies have had
the middle microswitch bypassed - presumably because it's a very small switch and difficult to source.)
The Nebitype manual has a procedure for setting the microswitches which involves using 4 sheets of paper - but not 5 - as an indication of the tolerances required.
Microswitch Adjustment
The middle MAT microswitch in the microswitch assembly has no simple means of adjustment outside of shimming it.
A tiny pin which protrudes from the front of the microswitch assembly actuates this subminiature microswitch when it comes into contact
with a matrix in the middle of the stick.
This pin has a very small amount of possible movement (less than 1 mm) and could become depressed even when a matrix in the stick were
misaligned - but if this happened at least one of PIN microswitches should be open because the misalignment should mean that the stick
won't be properly locked up.
The two PIN microswitches can be adjusted with a set screw (#2647) which is loosened/tightened as needed before reengaging the
locknut (#2648).
The PIN microswitches pivot on a fulcrum pin (#2646, Plate 4), with the amount of pivoting controlled by the set screw;
however the fulcrim pin is stamped into the microswitch assembly body and not welded in, so if the microswitch cover
(#2764, #2766, Plate 4) is not present there may be a fair amount of play in the pin which will likely cause
intermittent casting.
The microswitches in the machine date back to the 1950s/1960s, and may be getting a little unreliable. There are many similar
microswitches available, only some of which will work properly. Care should be taken with replacement switches to ensure:
- They have the correct locating pin location,
- The button is the correct length and in the correct location (i.e. fits cleanly through the hole in the assembly without rubbing and engages with the stick pin),
- The connections to the switch are the same, so the that switch is Normally Open,
- There is no electrical contact between the microswitch electrical connections and the microswitch assembly or set screw. (From the factory, the assembly has a small fibre plug (#2279) to prevent electrical connection between the microswitch terminals and the set screws, however none of these were installed in any of the assemblies I received with the machine. The switch would therefore likely be best insulated with a few layers of Kapton Tape, which is resistant to heat and puncture.
Testing the Microswitch assembly
The Manual notes the recommended method of verifying the microswitch assembly is working correctly, which involves simultaneously:- Having a stick in the stick holder with mats set in it,
- Holding the protective cover switch closed,
- Holding the two stick PINs down
- AFTER THE MACHINE CYCLE HAS PAST THE CASTING POINT.
The most important point being that the machine cycle must be past the casting point, when the plunger would have been activated. This is because prior to the casting point the plunger solenoid will not engage, at the casting point the plunger would engage and there's a risk of a squirt, but after the casting point the plunger solenoid will engage but the plunger will not be activated. If the timing is correct you should hear a "Snap" as the plunger solenoid engages.
This is a bit reliant your sense of timing, so a better option might be to disconnect the microswitch assembly plug from the body of the machine and put a multimeter over the two pins of the microswich assembly plug. (Note that one of the three pins of the microswitch assembly plug is not connected to anything. The other two should be open circuit until the stick is correctly locked up against the mouthpiece and mould.) Press the start button to run the machine through it's cycle and you should see a low resistance when the stick is locked up correctly. If this doesn't occur then the issue could be:
- Poor connections to the Microswitches
- Faulty Microswitches
- A break in the cable
Other things to check
- Each pin microswitch has a small steel "V" spring (2920, Plate 4) which holds the switch against the set screw. These are easily mislaid and without the V spring the microswitch could activate just from movement of the microswitch assembly.
- The microswitch assembly should be held to the stick holder with two springs (#2904), which will ensure the assembly remains engaged with the stick.
- The pins in the stick holder should move freely. The manual recommends washing these in kerosene if they become sticky.
- The armoured cable from the microswitch assembly to the plug should be properly secured at both ends, and the locking ring engaged against the Nebitype socket. The Armoured portion of the cable should be mechanically engaged at both ends. Some microswitch assemblies have a set screw to lock the cable in place whilst others use a locking gland.
Safety
If your Nebitype (or other line caster) has a propensity for squirts it's probably advisable to wear heavy cotton clothing and safety glasses. My experience of squirts is fairly benign, having only ruined a couple of shirts, which now have typemetal in the weave, however I have for the most part been lucky enough to have not had typemetal directly on the skin.
The manual recommends disconnecting the plug to the microswitch assembly when working on the machine to remove the risk of the plunger accidentally engaging.